The Privakey SSO is currently offered as a Beta. The service and this documentation is a work in progress. If you have any questions please contact support@privakey.com.
Microsoft 365
Feeling stuck or Confused? Don't worry! Just email support@privakey.com, and we will help you out right away! Remember, tech stuff can seem tricky, but with a bit of patience and this guide, you've got this! Happy Privakey-ing! 🚀
Cloud Native or Hybrid Cloud
Microsoft 365 implementations can broadly be categorized as either Cloud Native or Hybrid Cloud.
Know the difference
If you do not have an on-premises Active Directory connected to your Microsoft 365 environment you are Cloud Native.
If you have a Active Directory connected to Microsoft 365 then you are a Hybrid Cloud environment.
Get the right instructions
Connecting Privakey to Microsoft varies pending on your environment. Continue to the next section if you are Cloud Native. Jump ahead to Hybrid Cloud if you are Hybrid Cloud. Not sure? Reach out and we can help.
Cloud Native Instructions
The following instructions are for Cloud Native Environments. See Cloud Native or Hybrid Cloud to see if you are in the right place.
First, some pre-requisites:
- You need a Microsoft 365 account with a verified domain. Note - this won't work with personal accounts.
- You an Adminstrator in the Privakey Passwordless SSO.
- You need to be an Administrator in Microsoft 365. Please see the Important Note below.
- It's best you're on a PC. Unfortunately these instructions depend on Microsoft Powershell modules. They can work on other platforms but they require some monkeying about.
- You should have a valid domain connected and verified both on Microsoft 365 and Privakey.
Very Very Important Microsoft Administrator Account Note
It is very important that your Microsoft Administrator account is set as an onmicrosoft.com account. If you are administering the account with a domain account please create an onmicrosoft.com account before continuing. Doing so will ensure you can administer your account after switching to Privakey authentication.
Not sure or is something not matching up w/ our pre-requisites? Reach out to support@privakey.com, and we will help you out right away!
What we will be doing
In this guide will do a few things:
- Invite Users to Privakey
- Set Immutable IDs in Microsoft
- Turn on Privakey Authentication
- Adding New Users
Ready to go? If all your pre-requisites are in order lets set up Privakey Auth for Microsoft 365.
1. Invite Users to Privakey
Before turning on Federated access to Microsoft it is important that your users have access to the Privakey SSO. Make sure you invite your users to Privakey following this guide: Add / Manage Users
After your users have signed up for Privakey you can continue to the next step.
Important Once you complete this guide users who have not enabled Privakey will not be able to authenticate to Microsoft and may lose access to their emails. It is like changing the keys on a door - people won't be able to get in until they get the new key. It's OK - we can still get them set-up on Privakey later, but they will be locked-out until they do so.
2. Set Immutable IDs in Microsoft
In order to use 3rd Party authentication with Microsoft your Microsoft users must have an Immutable ID assigned. While it is very rare for Immutable IDs to be asserted in Cloud Native environments, first we will check to see to make sure they're not being used. If they are not currently being used, we will make your users email address their Immutable ID.
If they are being used we'll have to capture them and define them in the Privakey SSO.
a. Install MSOnline Powershell Module
Microsoft requires you use Powershell and a Powershell Module MSOnline (which gives access to a number of tools) to update the Immutable IDs. Powershell normally comes with Windows computers. The Module is easy to install.
- Launch Powershell as an Admin. On a PC, tap the Windows key and then type Powershell. Right click with your mouse and choose Run as Admin from the contextual menu.
- After Powershell launches type
Install-Module MSOnlineand hit return. The module will be installed.
b. Sign In to Microsoft's MsolService via Powershell
- Type the command
Connect-MsolService(this is part of the MSOnline module) and hit the Return key. - An authentication screen will pop up.
- Log in with your Microsoft Admin credentials.
After successfully logging in the prompt will disappear. You are now logged in.
c. Confirm there are no ImmutableID currently set
The following Powershell command will display all of your users by their email address and show any ImmutableIDs that are currently set.
If you don't see any ImmutableIDs continue on to the next step.
Are Immutable ID's already assigned? That's OK. We have a solution; reach out to support@privakey.com for more assistance.
d. Assert Immutable IDs
In order to set Immutable IDs you will run a simple command that sets the users upn (email address) to the ImmutableID.
That's it for this step. That wasn't too bad. To see the impact of that script feel free to run the prior command that lists all of your users. Where you didn't see ImmutableIDs before you now will.
Great We can now set up Privakey as your authentication method for Microsoft. Get ready to do away with passwords.
3. Turn on Privakey Authentication
In this section we will be connecting Microsoft and Privakey and enabling Privakey Authentication to Microsoft.
a. Enable Microsoft 365 in Privakey
First you'll need to let the Privakey SSO know you'll be enabling Microsoft as a Service Provider.
- Log in to the Privakey SSO as an administrator.
- Click on Admin in the top navigation.
- Click on Configure New Service Provider
- Find Microsoft in the list and click Configure
- Enter a Start Point. This is where clicking on the Microsoft Link from Privakey will go. We recommend
https://outlook.office.com - In the NameID field ensure Company Email is selected.
- Click Set Active.
That's it for this step. Privakey is ready for authentication requests from Microsoft.
b. Federate Authentication in Microsoft
This is the tricky part, but we've tried to make it easy. During this section you will configure Microsoft to use Privakey for authentication.
This is the final task. After completing the following steps you and your colleagues will use Privakey to log into Microsoft. Before completing this task make sure most of your users have enabled Privakey.
- Log in to the Privakey SSO as an administrator.
- Click on Admin in the top navigation. The following page will display:
- Click on Configure New Service Provider
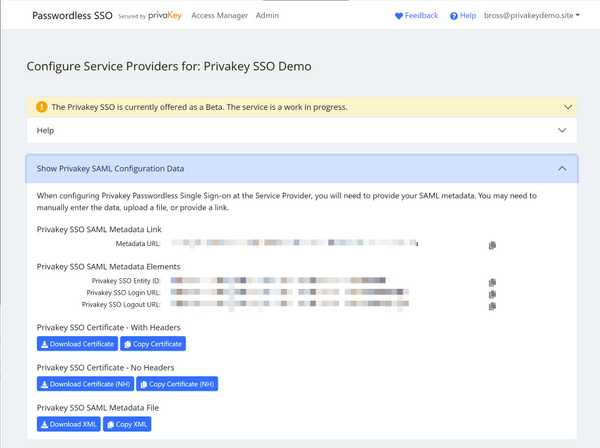
- Click on the header Show Privakey SAML Configuration Data. You will see the following screen. Note the Copy Icons - - next to each value. Use them to easily copy the value when needed.
We will be using values from this view in the tool below to generate a command to be used in Powershell.
Powershell Code Generator
Enter values as instructed in the form below. When all values are populated you can use the Copy button in the Formatted Powershell Input screen to copy the generated code.
Enter Privakey Data via Powershell (Continued)
- Type the command
Connect-MsolServiceand hit the Return key. - If you are not still authenticated, an authentication screen will pop up..
- Log in with your Microsoft Admin credentials.
- Once complete, scroll up a bit and click the Copy button on the top right of the Formatted Powershell Input display.
- Go back to powershell and paste the values (CTRL-V or left click with your mouse). The command will auto execute.
- Confirm the federation command worked by typing
Get-MsolDomain. You should see your domain noted as 'Federated'.
If you get an error check to make sure you inserted the correct values.
If you don't. Celebrate. Your users will now authenticate to Microsoft using Privakey!
Great Job You are now using Privakey Passwordless SSO for all of your users
Revert back to Password Authentication for Everyone.
If you need to reverse this step and return to normal Microsoft Authentication you can run the following command (Make sure to change "yourdomain.com" to your domain.):
4. Adding New Users
Now that your authentication has been Federated adding users to Microsoft 365 is going to be a bit different. Microsoft does not allow one to create users for federated domains. So we'll have to do a few things.
Every Microsoft 365 account is initialized with a domain.onmicrosoft.com domain that is available to use. We'll be leveraging this domain to add new users. At a high level the process will be:
- Add the user to Microsoft 365 in the onmicrosoft.com domain.
- Invite them to Privakey.
- Once they've enabled Privakey, we will run a script to change the user from onmicrosoft.com domain to the company domain.
1. Add the User to Microsoft 365
- Log into Microsoft 365 with an Admin Account.
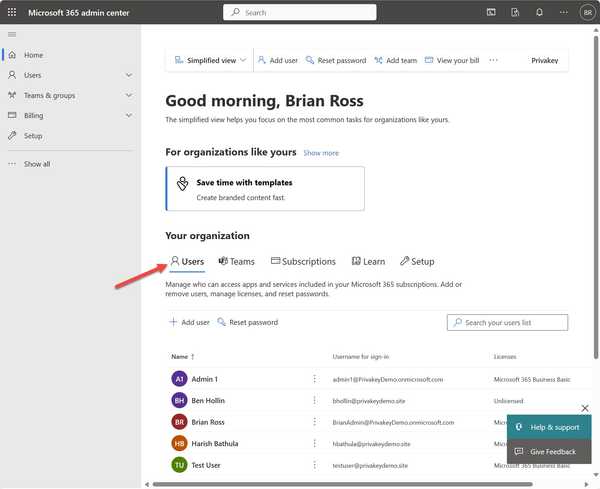
- Click on Admin in the left-hand navigation. The following page will appear:
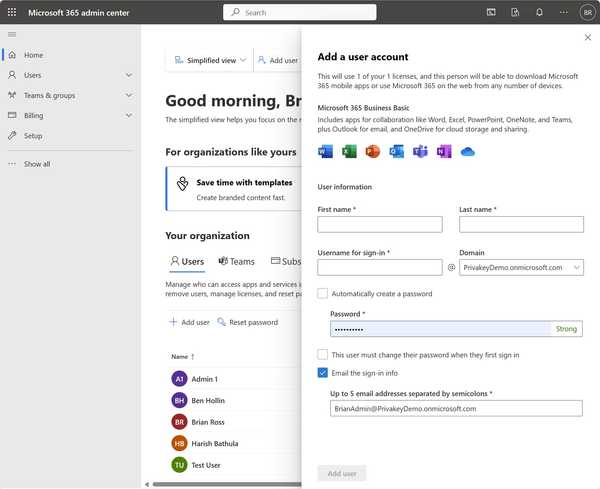
- Click on Add User. The following page will appear:
- Enter the user details. Note the Username for sign-in you enter will be their username within your domain once finished. For now it will be temporarily associated with the domain.onmicrosoft.com domain.
- You can choose to automatically create a password or assert a temperary password. You can also choose to force the user to change it, though this isn't necessary as they will soon set up a Privakey Authenticator.
- In the Email the Sign-in info you may want to choose a personal email of the user or simply have it sent to yourself so you can communicate it to the new user.
- After filling out the form, click. Add User.
After adding the user confirm they are able to log into Microsoft 365. Their temporary username will be like: username@domain.onmicrosoft.com
2. Add the User to Privakey
- Log into the Privakey SSO as an Administrator.
- Click on the Admin link on the top of the page.
- Then click on Manage Users on the Users card.
- On the subsequent page click on + Add User. The following page will show:
- Enter their information. For Email enter username@domain.com and for the Alternate Email enter username@domain.onmicrosoft.com.
- They will receive the invite for Privakey in Outlook addressed to username@domain.onmicrosoft.com.
- Ask the user to complete registration for Privakey and confirm they can log into the Privakey SSO.
3. Change the user from domain.onmicrosoft.com$$ to domain.com
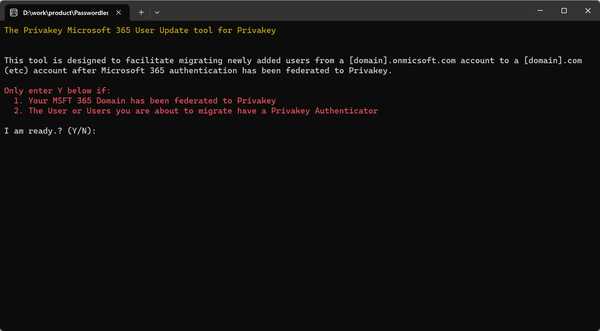
This process requires Powershell Commands, but we've made it easy by providing an executable script. Download it here: Privakey Migration Tool.
Once downloaded, extract the ZIP, double click on changeUser.exe and follow the prompts.
- Confirm you have already Federated your domain and that the user you're about to migrate has authenticated to Privakey SSO by entering Y.
- You will be prompted to authenticate. Use your Microsoft Admin account to authenticate.
- Enter the user's current, temporary user id (i.e. username@domain.onmicrosoft.com). If the user is found you are able to continue.
- Enter the user's permanent company user id (i.e. username@domain.com).
- That's it. You will see user information and see their updated UPN and Immutable ID.
Great They will now use Privakey to authenticate to Microsoft.
Hybrid Cloud Instructions
The following instructions are for Hybrid Cloud Environments. See Cloud Native or Hybrid Cloud to see if you are in the right place.
This guide is designed for Hybrid Cloud Environments comprised of Microsoft 365 and on-premises Active Directory deployments connected via Azure AD Connect.
First, some pre-requisites:
- You need a Microsoft 365 account with a verified domain. Note - this won't work with personal accounts.
- You an Adminstrator in the Privakey Passwordless SSO.
- You need to be an Administrator in Microsoft 365. Please see the Important Note below.
- Your Microsoft Environment must be configured as a Hybrid Cloud Environment comprised of an on-premises AD linked to a Microsoft 365 Cloud environment via Azure AD Conect.
- It's best you're on a PC. Unfortunately these instructions depend on Microsoft Powershell modules. They can work on other platforms but they require some monkeying about.
- You should have a valid domain connected and verified both on Microsoft 365 and Privakey.
Very Very Important Microsoft Administrator Account Note
It is very important that your Microsoft Administrator account is set as an onmicrosoft.com account. If you are administering the account with a domain account please create an onmicrosoft.com account before continuing. Doing so will ensure you can administer your account after switching to Privakey authentication.
Ready to go? If all your pre-requisites are in order lets set up Privakey Auth for Hybrid Cloud Microsoft 365
Not sure or is something not matching up w/ our pre-requisites? Reach out to support@privakey.com, and we will help you out right away!
What we will be doing
In this guide will do a few things.
First we will be configuring Staged Rollout for Hybrid Cloud Authentication. This process will allow users to continue using AD Passwords until they have enabled Privakey.
Then we will invite all users to Privakey.
Next we will Federate authentication to Privakey.
Lastly, we will move users to a group that will enforce Privakey authentication.
In summary:
- Configuring Staged Rollout
- Invite Users to Privakey
- Enable Federation
- Enable Privakey Auth for individual Users
1. Configure Staged Rollout
A Move all your users into a group
We will move all of your users into a group that will allow them the continue logging in with their existing username and password after we federate the domain to Privakey. Why? This way they can still access the services before they enable a Privakey Authenticator.
You can do this manually - it may be the best way if you have a small organization. Or, if you have a large organization we have a script that will do it for you.
Manually
In AD, create a group name ManagedAuthentication and ensure all users within the domain your are federating are assigned to it. If you are unsure of how to do this in your environment we recommend you consult Microsoft documentation.
Use a Script
Have lots of users? We have created a script that will do this for you.
It does a few things:
- Creates a group ManagedAuthentication
- It Prompts you for you domain name.
- It moves every user associated with that domain name to the group.
Lets use it.
First - contact Privakey to receive the script.
Once you have the script, open a PowerShell command prompt with administrative privileges.
Navigate to the directory where you saved the .ps1 script using the cd (Change Directory) command. For example:
cd C:\Path\To\The\privakeyAddToGroupScript.ps1Set the execution policy if you haven't already. You can use the Set-ExecutionPolicy cmdlet. For example, to allow script execution, use:
Set-ExecutionPolicy RemoteSignedSet-ExecutionPolicy RemoteSignedRun the script by typing its filename (including the .ps1 extension) and pressing enter.
.\privakeyAddToGroupScript.ps1A login window will pop-up. Authenticate to Microsoft 365 using your administrator credentials.
The login window will close and you will be prompted for your domain name. Enter it at the prompt and click return.
All domain associated users will be moved to the new group ManagedAuthentication. Wasn't that easy? 🎉
Important
To ensure untrusted commands cannot be run in Powershell revert the Execution Policy to Restricted using the following command:
Set the ManagedAuthentication group to use Managed Authentication.
We will be using a Microsoft Entra capability designed to facilitate a staged rollout of cloud authentication. To do this we must create a group, add all your users to this group and configure this group to use traditional authentication. Once we do this, we'll turn on Privakey Authentication and migrate users to Privakey slowly.
a. Log into Microsoft 365 with an Admin Account.
You will likely see the base home page.
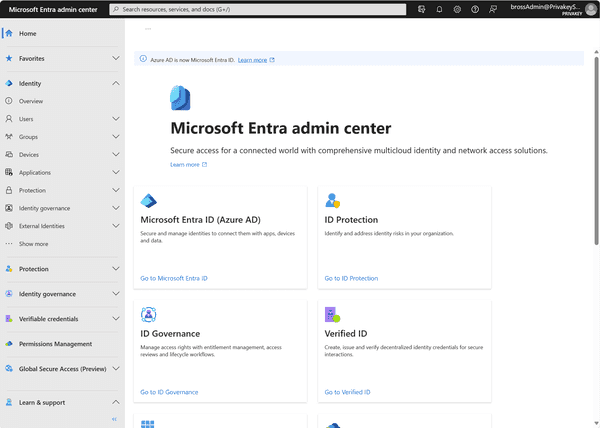
Microsoft Home Page
b. Navigate to Identity (i.e. Entra)
- Navigate to Entra using the left-side navigation. It can be a bit wonky, but you should see a link name 'Admin'. You may need to click on 'Explore All your Apps' before it displays. Once you can see it, click on the Admin Link.
- You'll now be on the Microsoft 365 Admin center. On this page there are two Navigation links on the top left of the screen. Click on the Hamburger menu (three bars) then click on Identity. You may need to click on ... Show All for Identity to show up. You should see the Microsoft Entra Admin Center
Microsoft Entra Admin Center
Having issues? Just click here: Microsoft Entra .
FYI: Microsoft is currently rebranding Azure AD to Entra. From what we can tell they've mostly completed the name-change so we have been and will be referring to Entra in this document. Don't worry if you see Azure AD instead of Entra - they are the same thing.
c. Navigate to Hybrid Management > Microsoft Entra Connect
From the Entra Admin console use the left hand navigation to go to Identity > Hybrid Management > Microsoft Entra Connect
Not seeing any words in the left-hand navigation? You may need to make your window wider or click >> on the bottom of the menu.
Not seeing Identity > Hybrid Management? You may need to expand the navigation by clicking ... Show more.
Still having trouble, just click here: Microsoft Admin - Entra Connect
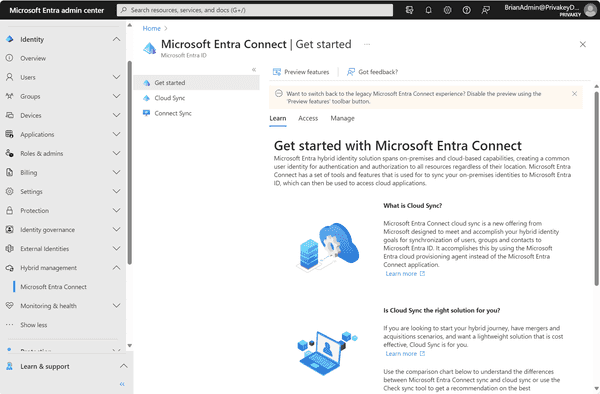
If you see the Microsoft Entra Connect screen below you have succeeded.
Microsoft Entra Connect.
d. Configure Staged Rollout
Microsoft's guidance text for this capability is a bit confusing. We are not syncing password hashes, we are just defining segmenting this user group to not use federation once it is enabled.
- Click on Connect Sync in the middle-left of the page.
- Scroll down to the section Staged Rollout of Cloud Authentication
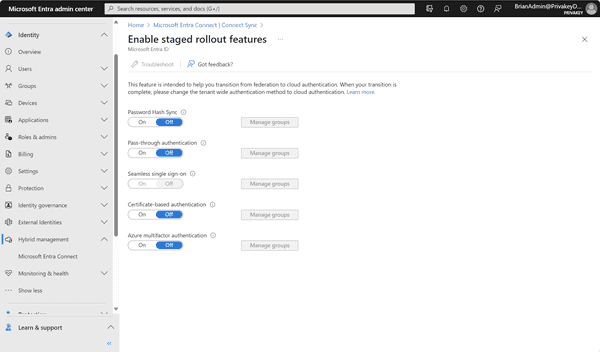
- Click on Enable staged rollout for managed user sign-in The following page will be displayed:
Enable staged rollout
- Toggle Pasword Has Sync on.
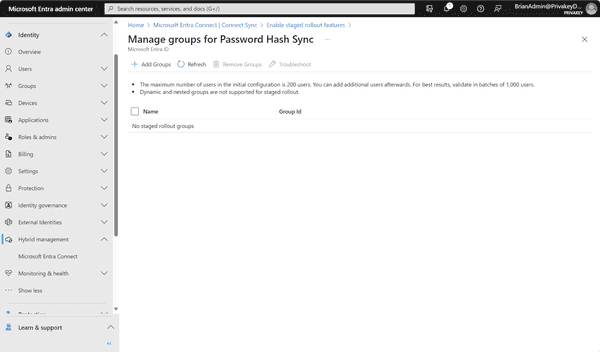
- Click on the Manage groups button. The following page displays.
Manage groups for Password Hash Sync
That's it! All your users are now set up to continue to use microsoft username and password during the first step of migration.
Once your user have enabled Privakey you will remove this group assignment and they will begin logging in without passwords.
2. Turn on Privakey Authentication in the Privakey SSO
You'll need to let the Privakey SSO know you'll be enabling Microsoft as a Service Provider.
Important - ImmutableID
In a Hybrid Cloud Environment, all of your users have an Immutable ID. You will need to include this in a users profile when you add them to Privakey. Instructions are pending on how to self-manage custom user profile fields such as ImmutableId. For now, contact Privakey to have this field enabled for your environment.
Configure Microsoft in Privakey
- Log in to the Privakey SSO as an administrator.
- Click on Admin in the top navigation.
- Click on Configure New Service Provider
- Find Microsoft in the list and click Configure
- Enter a Start Point. This is where clicking on the Microsoft Link from Privakey will go. We recommend
https://outlook.office.com - In the NameID field ensure ImmutableID is selected.
- Click Set Active.
That's it for this step. Privakey is ready for authentication requests from Microsoft.
3. Federate Authentication in Microsoft
During this section you will configure Microsoft to use Privakey for authentication. We have developed a Powershell command generator to make this step easy.
- Log in to the Privakey SSO as an administrator.
- Click on Admin in the top navigation. The following page will display:
- Click on Configure New Service Provider
- Click on the header Show Privakey SAML Configuration Data. You will see the following screen. Note the Copy Icons - - next to each value. Use them to easily copy the value when needed.
We will be using values from this view in the tool below to generate a command to be used in Powershell.
Powershell Code Generator
Enter values as instructed in the form below. When all values are populated you can use the Copy button in the Formatted Powershell Input screen to copy the generated code.
Enter Privakey Data via Powershell (Continued)
- Type the command
Connect-MsolServiceand hit the Return key. - If you are not still authenticated, an authentication screen will pop up..
- Log in with your Microsoft Admin credentials.
- Once complete, scroll up a bit and click the Copy button on the top right of the Formatted Powershell Input display.
- Go back to powershell and paste the values (CTRL-V or left click with your mouse). The command will auto execute.
- Confirm the federation command worked by typing
Get-MsolDomain. You should see your domain noted as 'Federated'.
If you get an error check to make sure you inserted the correct values.
If you don't. Celebrate. The challenging bits are over. While your users will now all be able to authenticate to Microsoft using Privakey, nothing has changed just yet. So, let's invite them to Privakey.
UNDO! Something went wrong
If you need to reverse this step and return to normal Microsoft Authentication you can run the following command (Make sure to change "yourdomain.com" to your domain.):
4. Invite Users to Privakey
Now we are ready to invite users to Privakey.
It makes sense to test this with a few users first. And - it's easy to revert, don't worry.
Privakey is adding a bulk upload capability early in 2024 that will facilitate adding large number of users.
Invite Users
Once the ImmutableID field is availalbe, invite your users to Privakey following this guide: Add / Manage Users
After your users have signed up for Privakey you can continue to the next step.
Remove ManagedAuthentication Group Assignment
Once you users have enabled a Privakey Authenticator you simply need to remove the ManagedAuthentication group assignment in AD. You may need to invoke an AD Sync for the changes to reflect in Microsoft 365. With many things in Microsoft this may take a few minutes to a few hours to take effect.
Want to go back to Managed Authentication
If a user want to return to using UserName and Password please re-assign the ManagedAuthentication group.
That is. The user is now using Privakey for authentication. Keep inviting more users the gain the benefits of Passwordless authentication
Stuck or Confused? Don't worry! Just email support@privakey.com, and we will help you out right away! Remember, tech stuff can seem tricky, but with a bit of patience and this guide, you've got this! Happy Privakey-ing! 🚀
Document Version: 1.1 | December 22, 2023.


