The Privakey SSO is currently offered as a Beta. The service and this documentation is a work in progress. If you have any questions please contact support@privakey.com.
Google Workspace
** ⭐Quick Peak:** Privakey lets your organization log into Google Workspace without a password. Cool. Right? Let's set it up!
Before We Dive In:
- You need a Google Business or Enterprise Workspace account with a verified domain. For now, no personal accounts, please!
- You should be a boss (Admin) of both your Google Workspace and your Privakey Passwordless SSO.
- Make sure the domains you use for Google and Privakey (eg. “yourorganization.extension” as defined in each) are the same.
Lets Get Started!
REST EASY: There are only 3 steps to this process. Step 1 is to make some decisions and get things ready for integrating Privakey with Google Workspace. Step 2 involves adding information into both Privakey and Google but doesn’t turn on the capability just yet. Step 3 is to then turn on Privakey for users and groups of users. You quickly and easily can turn Privakey off anytime also. Don’t sweat it. We’ve got you covered!
1. Get Prepared! Get Google and Privakey ready to work together.
A) Turn on Privakey to work with Google Workspace:
- Hop into Privakey: Go to Privakey SSO and log in.
- Click on "Admin" at the top.
- Choose "+Configure New Service Provider" (found at the bottom the Configured Service Providers section), and on the subsequent page just pick "Google Workspace" and hit “Configure”.
- Type in your domain (like acme.co, but use your own!).
- Click "Submit".
B) Get your Google Admin set up as a separate email/login if need be!
GOOD NEWS/BAD NEWS: Google Admins themselves cannot use Privakey to login to their Google Workspace Accounts! This is SADLY a Google limitation – don’t blame us!
So – if you are the admin and want to continue using your email and the rest of Google Workspace WITH Privakey we recommend moving admin capabilities to another login (for example, create a company-admin login on Google), and move the admin capabilities for Google off your current admin account to the newly created company admin account. Yes, eventually, you will be the only one left using a password with Google – until they change that policy – but at least you can finally eliminate almost all those weak password doors hackers so readily exploit!
That was the BAD NEWS.
The GOOD NEWS? This is actually a best-practice to keep super user/admin capabilities separate from personal email, and you can make a strong, dedicated password just for the admin function going forward!! Feel better already, yes? 😀 - “YES!”
C) For managing Google Workspace end-user migration onto Privakey - Getting Google Workspace Ready by Setting Up Google Organizational Units (OU):
Think of OUs like folders in Google where you can organize users who have the same capabilities in your Google Workspace. We're going to be making a special folder(s) for Privakey users so we can support flexible individual adoption of Privakey by your users when they are ready!
Your Google Workspace will have one or more OUs currently defined. One top-level OU is defined when you created your Google Workspace account (It defaults to your domain you set up with Google Workspace – example: acme.co)
Many organizations will have not set up sub-OUs already – and if you are one of them, don’t worry. They typically only come into play when you are giving different Google application access to different group of Google users. If you don’t already have OUs set up in Google then this step is super easy! Ours will be your first!
i) For those of you which don’t already have OUs set up, login to your Google Admin account:
- In Google Admin (left-hand side bar), go to Directory > Organizational Units.
- Click "Create Organization Unit" in the top of the center window.
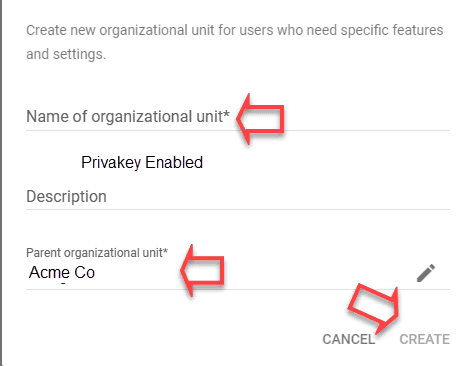
- Name the new organizational unit "Privakey Enabled" and make sure the parent organizational unit is your domain with Google Workspace. Click Create.
Org Unit Example
Later (in step 5), when someone has installed the Privakey software you will then turn them ON in Google Workspace by simply changing their current OU to the “Privakey Enabled” OU! You can now skip ahead to Step 2 Linking.
ii) BUT, if you do have OUs already set up in Google (perhaps you/someone set up groups of users that get access to different Google- and related applications) then it is JUST a little more effort.
In Google Admin, go to Directory > Organizational Units.
- For each OU you have established, select that OU and create a new OU as a sub-group to that original OU, naming the new sub-OU “Privakey Enabled”. You should do this for every original OU where you have users for which you want to enable Privakey.
After creating the OUs your Organizational Unit Structure will resemble the diagram below.
AcmeCo|__ Management //Example Existing OU| |___Privakey Enabled //NEW – you add this||__Sales //Example Existing OU|__Privakey Enabled //NEW – you add this||__Etc. //Other Existing OUs|__Privakey Enabled
OU Example for Acme Co with existing OUs
Again later (in step 3), when someone has loaded the Privakey software you will then turn them ON in the system by simply changing their personal OU membership from the original sub-OU in which they belonged to the newly added sub-OU under their original OU group (eg. their specific “Privakey Enabled” sub-OU!)
Pro Tip If you ever need to quickly turn-off someone’s Privakey passwordless login and change them back to signing in with their password (as before), that’s super easy too! Just change them from the “Privakey Enabled” OU back to their original sub-OU (the parent to their specific Privakey Enabled OU) that won’t be set up for Privakey. That will change them back to using their original password as before. It is that simple!
STEP 2. Linking: Making Google and Privakey Best Friends!
PRO TIP: If you can have the Privakey SSO Admin portal open in one window and the Google Workspace Admin portal open in another, you can simply cut and paste links between the two (copying from Privakey into Google). Otherwise, have paper and pen handy!
A) “Turn on” SSO for Privakey Enables OUs, leaving other OUs/users using passwords still:
In Google Admin, go to Security > Authentication > SSO with third party IDP.
Down on the page in the center page content area is “Manage SSO profile assignments” – click on Get Started or Manage.
Pro-Tip: Always start with the top-most OU (the domain OU) and work down into the sub-OUs so you always will set the top domain OU to “NONE” (meaning, working with passwords as things work today, by default) first before eventually setting any sub-OU named “Privakey Enabled” to working with Privakey.
Click on each OU and sub-OU listed in the lower left hand navigation. For each OU and sub-OU:
- If the OU is named Privakey Enabled then select the box titled Organization's third-party SSO Profile. Select Save.
- If the OU is not named Privakey Enabled then select the box titled None (users will sign in with Google passwords as before). Select Save.
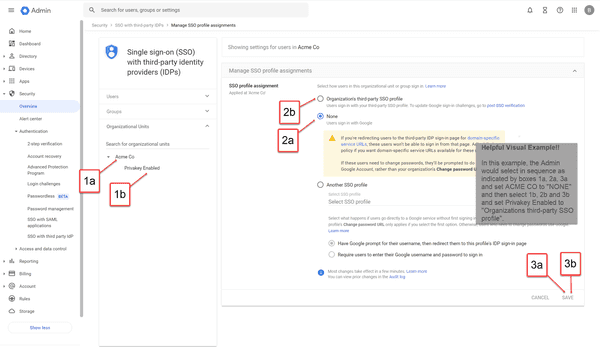
Here’s an example of what that page looks like, and the selection for the top-most OU (the original OU (for example, ACME CO), pre-adding Privakey capabilities) which should be set to “None”. For the Privakey Enabled OU you would select “Organizations third-party SSO profile”.
Manage SSO Assignment - Example
B) Setting up links between Privakey and Google:
1. Stay in the Google Admin window, and use the left hand navigation to navigate to Security > Authentication > SSO with third party IDP.
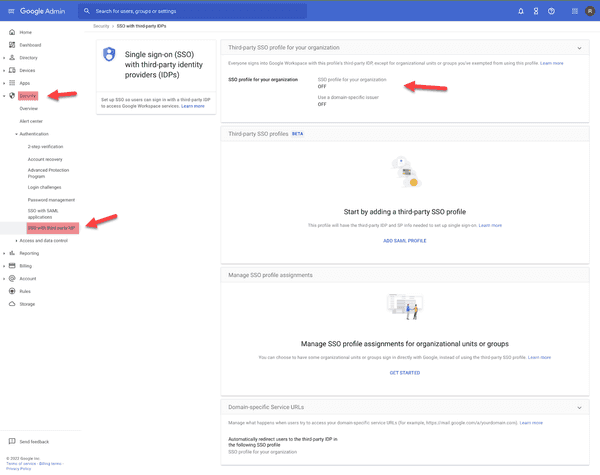
Google SSO with third Party IDP Page
On that page find the section titled Third-party SSO profile for your organization.
It's tricky, there is also a section called Third-party SSO profiles - ignore it. You want the one titled Third-party SSO profile for your organization. It is the the top most section of this page. Refer to the image above for a guide.
2. Click on the Box "Third-party SSO profile for your organization"
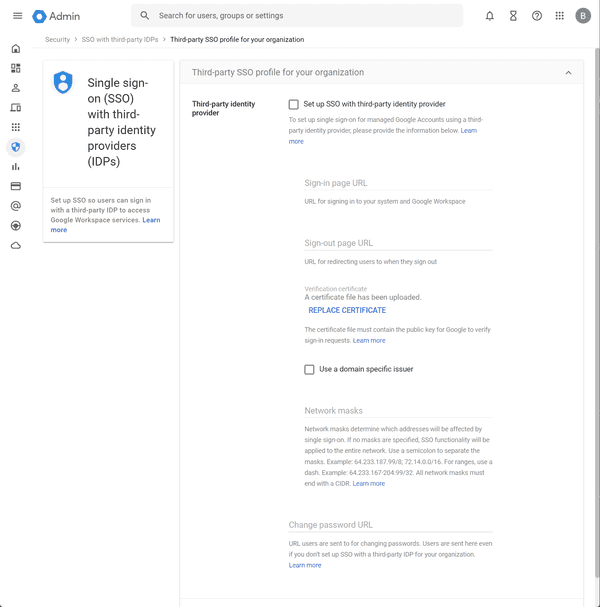
The page should look like the following image. If it doesn't, go back and make sure you selected Third-party SSO profile for your organization
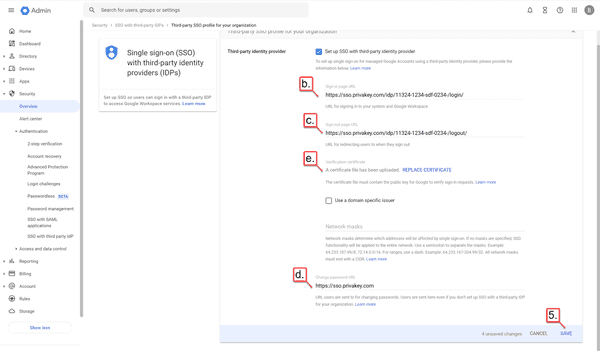
Google SSO Config Page
3. Go back to Privakey Admin Home Page, Select “Configure New Service Provider” and then on the card header **Show Privakey SAML configuration Data” to display your Privakey Passwordless SAML data. The following screen will show:
Privakey SAML configuration Data Admin Portal Window
4. Now, copy-paste the info from Privakey Admin Portal Window into Google:
a. Check the box “Set up SSO with third party identity provider”
b. For the Google Sign-in page URL: Use the Privakey SSO Login URL.
c. For the Google Sign-out page URL: Use the Privakey SSO Logout URL.
d. For the Change password URL in Google: Type in https://sso.privakey.com, and then, just more thing!
e. The Verification Certificate: Download that file from Privakey, and upload as indicated into Google.
Here’s sample of what you might be looking at in the Google Workspace Admin Window:
5. Click Save
C) LETS CONFIGURE THE DEFAULT LOGIN BEHAVIOR FOR PEOPLE STILL USING PASSWORDS – (in Google’s terms these are DOMAIN-SPECIFIC SERVICE URLS)
ONE LAST THING – WHILE YOU ARE ON THE MAIN PAGE FOR “Single sign-on (SSO) with third-party identity providers (IPDs).
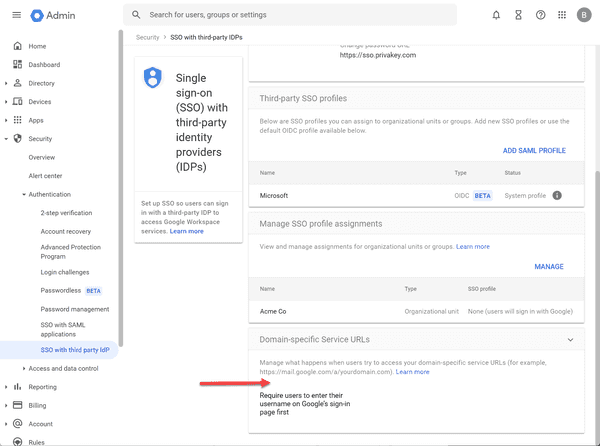
The last Card in the Google Admin Single sign-on (SSO) with third-party identity providers (IDPs) page is titled "Domain-specific Service URLs". We need to set up behavior for what happens when a Google Workspace user goes to certain google urls such as mail.google.com/a/yourdomain.com.
Click on the card "Domain-specific Service URLs".
Select the second option - Require users to enter their username on Google's sign-in page first, and remember to click “Save”. This configuration will allow users who have not enabled Privakey Passwordless SSO to continue to use these types of URLs to access Google.
Hurray! You are now ready to turn individual people on with using secure Privakey Passwordless Login in Google Workspace!!
STEP 3. Turning On Privakey for Your Specific Team Members:
If you already have users using Privakey Passwordless SSO for other services you can skip to Step B. Enable Privakey Authentication in Google below.
The Steps for onboarding new Privakey SSO Users is:
A. Invite them from the Privakey Passwordless SSO Admin Console
Click on Admin in the top Navigation. The Admin dashboard for your company will display.
Company Admin
3. Manage Users
Click on Manage Users in the User card. A list of your current users will show.
4. Add User
In the upper right of the Manage Users card you will see a link +Add User.
Click + Add User. The New User form displays. Enter the user's First Name, Last Name and company email address.
They will receive an email with instructions on how to continue.
5. Instruct the invited colleague to set up Privakey
Advise the user to check their email. The email will come from noreply@privakey.com. The end-user will use this email to complete sign-up and create their first Privakey authenticator.
End-User instructions can be found here: Using the SSO - Getting Started
B. Enable Privakey Authentication in Google
Once your end-user has completed enrollment and has an active Privakey authenticator you can enable Google SSO Authentication for them in the Google Admin console by adding them to the appropriate Privakey Enabled OU.
1. Return the Google Admin Console
Return to the Google Admin console.
2. Navigate to the User profile
Using the left-hand navigation, navigate to Directory > Users Link .
Find or search for the user for whom you want to enable Privakey Authentication.
3. Change their OU to Privakey Enabled
On their user page, click on Change Organizational Unit in the left hand navigation.
Assign them to the appropriate Privakey Enabled OU.
Congratulations
That user now has the Privakey App, can authenticate to Google Workspace using the Privakey App and will be able to access other services when they are configured.
Have them go to Google, enter their user-id and complete a login.
Repeat this step for every user who has enabled Privakey.
THAT'S IT!
🎉 YAY! That person can now use Privakey to log into Google Workspace!
IMPORTANT - Tips and Reminders:
Google Admins
If you're a Super Admin in Google, you can't use Privakey. But you can make a separate account for admin stuff and use Privakey for your regular account.
Turning Off Privakey(for Google Workspace)
- If you ever want to turn off Privakey for an individual, just move them out of the "Privakey Enabled" OU in Google.
- To disable Privakey for an entire OU just navigate to that OUs profile in Google (per section 2B above) and click “NONE” for any specific OU.
- To disable Privakey Passwordless SSO for your entire company for Google Workspace, navigate to Single sign-on (SSO) with third-party identity providers (IDPs). Click the edit icon next to SSO profile for your organization and toggle the profile OFF. The entire company will revert to Google's username / password authentication for Google Workspace.
Stuck or Confused? Don't worry! Just email support@privakey.com, and we will help you out right away! Remember, tech stuff can seem tricky, but with a bit of patience and this guide, you've got this! Happy Privakey-ing! 🚀
Document Version: 1.2 | January 17, 2024.

