The Privakey SSO is currently offered as a Beta. The service and this documentation is a work in progress. If you have any questions please contact support@privakey.com.
Box
Hold on!
⭐ Privakey lets your organization log into Box without a password. It's a great way to protect all of your IP stored in the cloud.!
Before We Dive In:
- You need at least a Box Business account plan.
- You should be an Admin in both Box and the Privakey Passwordless SSO.
Lets Set Up Box and Privakey 🚀
It's not hard - but Box needs to get involved. While there are only a couple of steps to this process, Box makes it a bit more difficult than other providers. Don't worry - it's worth it.
A). Send Box some information
- Head over to Privakey: Go to Privakey SSO and log in link .
- Click on "Admin" at the top.
- Choose "+Configure New Service Provider" (found at the bottom the Configured Service Providers section), and on the subsequent page just pick "Box" and hit “Configure”.
- You only need to enter one thing - that's your Workspace ID (not your Workspace name - that could be the same but it's just a little bit different integration-wise). What's your Workspace ID? On the web you go to a Workspace by navigating to workspaceID.slack.com. In the App - just click your Workspace name and it will show a URL - the Workspace ID is the first bit. For example, for us is is just privakey so we used privakey. Are you acme.co? You'd probably use acme. Just find it in your Slack Workspace. Do you have it? OK - enter your Workspace ID in the form.
- Click "Submit".
You're all done with this bit of configuration! ⭐
We're done here, but leave the Privakey Admin console open. We'll need some info from there in just a moment.
B) Configure Privakey in Slack
PRO TIP: If you can have the Privakey SSO Admin portal open in one window and the Slack Admin portal open in another, you can simply cut and paste links between the two (copying from Privakey into Zoom). Otherwise, have paper and pen handy!
OK - now we are going to input data that lets Slack know about Privakey in the Slack admin portal and turn on SSO.
- Log into Slack Administration by going to workspaceID.slack.com/admin - of course, replace workspaceID with your own Workspace ID!
- In the left-hand navigation select Authentication. No left-hand navigation? Click on the hamburger menu in the top left of the screen - the navigation pane will pop out.
- Click on Authentication in the left-hand navigation.
- You should see SAML Authentication in the middle of the page. Click to configure.
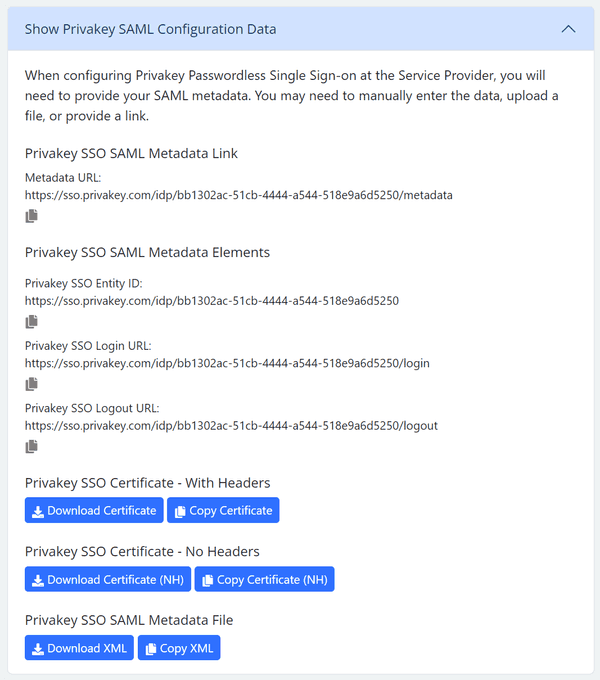
- Now we'll be cutting and pasting information from Privakey to Slack. Go back to Privakey Admin Home Page, Select “Configure New Service Provider” and then on the card header **Show Privakey SAML configuration Data” to display your Privakey Passwordless SAML data. The following screen will show:
Privakey SAML configuration Data Admin Portal Window
- Now, copy-paste the info from Privakey Admin Portal Window into Slack (to copy a value from Privakey just click on the icon.) There are also a few things you'll need to configure:
- Copy Privakey SSO Login URL and paste it to the SAML 2.0 Endpoint (HTTP) in Slack.
- Copy the Privakey SSO Entity ID and paste it to the Identity Provider Issuer in Slack.
- Copy the Privakey SSO Certificate - With Headers from Privakey (by clicking the button Copy Certificate) and paste in the Public Certificate field in Slack..
- Expand Advance Options
- Make sure Assertions Signed is ticked.
- In Settings
- Review the Authentication for your workspace must be used by: section.
- Are all your users on Privakey? We recommend you select All workspace members, except guest accounts
- However, if you have workspace members who are not part of your domain - you must select It's Optional.
- Leave everything else un-checked.
- Review the Authentication for your workspace must be used by: section.
- Leave the button configuration just as it is or have fun renaming it - it's up to you!
- Click - Test Configuration. It should pass! If it hasn't, Go back to Step A and review your work!
- If it passes - toggle SSO on by saving changes!
That's it! Your Privakey-enabled users can now access Slack with Privakey. 😊
Turning Off Privakey SSO
We hope you don't want to, but if you must turn off Privakey SSO for access to Slack you should:
- In the left-hand navigation select Authentication. No left-hand navigation? Click on the hamburger menu in the top left of the screen - the navigation pane will pop out.
- Click on Authentication in the left-hand navigation.
- Click on Change Settings.
- On the upper right you'll see a Toggle Button w/ the work Configure. Click on it to toggle to Test Mode.
- Click "Save Configuration"
Privakey is now off. Sorry to see you go! ☹️
Stuck or Confused? Don't worry! Just email support@privakey.com, and we will help you out right away! Remember, tech stuff can seem tricky, but with a bit of patience and this guide, you've got this! Happy Privakey-ing! 🚀
Document Version: 1.0 | August 16, 2023.
Stuck or Confused? Don't worry! Just email support@privakey.com, and we will help you out right away! Remember, tech stuff can seem tricky, but with a bit of patience and this guide, you've got this! Happy Privakey-ing! 🚀
Document Version: 1.0 | January 17, 2024.

